Example App
Link to Source: app
Overview
This application demonstrates a simple state machine controlled by a button. When the button is pressed, the system toggles between two states:
Sleep: LED is off, system waits for events (blocking)
Active: LED blinks continuously (50ms on, 500ms off)
The application showcases a modular design with inter-component communication via ZBus, allowing the Button component to notify the LED component of state changes without direct coupling. This decoupled architecture enables testing individual components in isolation.
This application is useful for:
Understanding modular architecture in Zephyr
Learning about ZBus for inter-component communication
Using Zephyr System Initialization (SYS_INIT) for application initialization
Testing with native_sim Board and Twister
Architecture
The application follows a modular design where functionality is organized into
reusable components. The source code is located in the app/src/ directory,
with a clear separation between common infrastructure and feature-specific
components.
The app/common/ directory contains shared components like message channels
that enable inter-component communication, while the app/components/ directory
contains the individual functional units. Each component is self-contained with its
own source files, build configuration, and Kconfig options.
app
├── CMakeLists.txt
├── Kconfig
├── prj.conf
├── README.rst
├── sample.yaml
├── src
│   ├── common
│   │   ├── CMakeLists.txt
│   │   ├── message_channel.c
│   │   └── message_channel.h
│   ├── main.c
│   └── components
│       ├── button
│       │   ├── button.c
│       │   ├── CMakeLists.txt
│       │   └── Kconfig.button
│       ├── led
│       │   ├── CMakeLists.txt
│       │   ├── Kconfig.led
│       │   └── led.c
│       ├── sys_ctrl
│       │   ├── CMakeLists.txt
│       │   ├── Kconfig.sys_ctrl
│       │   └── sys_ctrl.c
└── test_cfg
├── button_component.conf
├── led_component.conf
└── sys_ctrl_component.conf
The tree shows a simplified view of the structure of the application.
Initialization using SYS_INIT
The application’s components are initialized independently of the main()
function using the SYS_INIT macro. This allows components to inject their
initialization routines into the OS boot sequence automatically.
Each component uses SYS_INIT() with APPLICATION priority to register itself
after drivers and ZBus are operational.
This initialization pattern ensures:
Components start automatically without explicit calls from
main()Dependencies (drivers, ZBus) are ready before component initialization
main.cremains a lightweight placeholder, decoupled from application logicEach component can be tested in isolation by simply including it via Kconfig
Each component has its own priority configuration option that defaults to a numeric
value (e.g., CONFIG_SYS_CTRL_COMPONENT_INIT_PRIORITY=85) to control
initialization order. The entry with the lowest number will be started first.
Example from Kconfig.sys_ctrl:
config SYS_CTRL_COMPONENT_INIT_PRIORITY
    int "System control component init priority"
    default 85
    help
      System initialization priority for the system control component.
      This determines the order in which the component is initialized.
The APPLICATION level ensures proper ordering relative to driver
initialization while allowing custom priorities within the application phase.
Example from sys_ctrl.c:
SYS_INIT(sys_ctrl_init, APPLICATION, CONFIG_SYS_CTRL_COMPONENT_INIT_PRIORITY);
Initialization sequence (Zephyr System Initialization)
SYS_INIT components (priority order):
Button (priority 80)
Button Mock (priority 80)
System Control (priority 85)
LED (priority 90)
main thread with Prio -1
Empty in our case (except one log msg)
Boot log showing this order:
*** Booting Zephyr OS build v4.3.0 ***
<inf> button_component: Set up button at gpio_emul pin 1
<inf> button_component: Button component started
<inf> button_mock: Button mock component initialized
<inf> sys_ctrl: sys_ctl component started
<inf> led_component: LED component initialized
<inf> app: System booted. Main thread going to sleep.
System States
The application implements two system states:
Sleep (
SYS_SLEEP): LED is off, system waits for eventsActive (
SYS_ACTIVE): LED blinks, system is active
Button presses toggle between these states via ZBus messages.
Component Configuration
Each component can be independently enabled or disabled via Kconfig options.
example from app/prj.conf:
# Enable components
CONFIG_LED_COMPONENT=y
CONFIG_BUTTON_COMPONENT=y
CONFIG_SYS_CTRL_COMPONENT=y
Additionally, each component provides optional shell commands that can be activated per component. These shell commands can be used for testing the components in isolation or within the application.
# Control individual component shell configurations
CONFIG_BUTTON_COMPONENT_SHELL=y
CONFIG_LED_COMPONENT_SHELL=y
CONFIG_SYS_CTRL_COMPONENT_SHELL=y
And the same works for Logging. Log levels can be set individually for each component.
# Enable debug logging for each component
CONFIG_LED_COMPONENT_LOG_LEVEL_DBG=y
CONFIG_BUTTON_COMPONENT_LOG_LEVEL_DBG=y
CONFIG_SYS_CTRL_COMPONENT_LOG_LEVEL_DBG=y
These options allow building the application with any combination of components, enabling testing in isolation or creating minimal builds. If features like e.g. shell commands are not activated they will not be compiled into the binary.
Component Communication
Components communicate via ZBus channels:
event_ch: Different events events (publisher: Button component, subscriber: sys_ctrl)sys_ctl_ch: System state changes (publisher: sys_ctrl, subscriber: LED component)
Hardware Abstraction
On native_sim, the application uses:
GPIO Emulator (zephyr,gpio-emul) for button and LED
PTY UART for shell on separate console
Devicetree Overlay to define button alias and UART configuration
The overlay file (boards/native_sim.overlay) defines:
sw0alias for the buttonuart1enabled for shellShell UART mapped to
zephyr,shell-uart
Build/Run
The native_sim board allows Zephyr applications to be compiled as native
Linux executables, enabling development and testing without physical hardware.
Build the application for native_sim:
host:~$ west build -b native_sim app -p
Run the application with shell on a separate UART/console:
host:~$ ./build/zephyr/zephyr.exe -uart_1_attach_uart_cmd='ln -sf %s /tmp/zephyr_shell'
When you run the application, it creates two pseudo-terminals (PTYs):
uart_0 (/dev/pts/X) - Main console (logs and shell if not redirected)
uart_1 (/dev/pts/Y) - Shell console when using
-uart_1_attach_uart_cmd
With the -uart_1_attach_uart_cmd option, the shell UART is redirected to a
separate PTY and linked to /tmp/zephyr_shell. The main UART output (logs)
remains on the terminal where you started the application, check native_sim
PTY UART to get more information.
Connect to the shell using:
host:~$ tio /tmp/zephyr_shell
Sample Output
Main console (stdout):
*** Booting Zephyr OS build v4.3.0 ***
<inf> button_component: Set up button at gpio_emul pin 1
<inf> button_component: Button component started
<inf> button_mock: Button mock component initialized
<inf> sys_ctrl: sys_ctl component started
<inf> led_component: LED component initialized
<inf> app: System booted. Main thread going to sleep.
Shell via /tmp/zephyr_shell:
host:~$ tio /tmp/zephyr_shell

  button       clear        date         device       devmem       help
  history      kernel       led          mock_button  rem          resize
  retval       shell        sysctrl
uart:~$
You can now interact with the shell in one terminal and observe the logging output of the application in another.
Exit native_sim by pressing CTRL+C.
Build for a board
To build for the reel_board (e.g., reel_board@2), use:
host:~$ west build -b reel_board@2 app -p
host:~$ west flash
Shell Commands
When the application is built with shell support, each component provides commands
for testing and debugging. These commands are available when the corresponding
CONFIG_*_COMPONENT_SHELL option is enabled.
System Control Component Commands
The system controller provides commands to inspect and manipulate system state:
uart:~$ sysctrl state   # Display current system state
uart:~$ sysctrl button  # Simulate button press via ZBus
State Display shows whether the system is in SLEEP or ACTIVE state.
Hardware Simulation Commands
On native_sim, the GPIO emulator provides additional commands for simulating
hardware-level button presses:
uart:~$ mock_button # Simulate physical GPIO button press
This triggers the actual GPIO interrupt handler with debouncing, testing the complete button signal path from hardware to application.
Testing
The application uses a multi-level testing approach:
Interactive component Test
app/test_cfg/defines test configs to build modules in isolation. The components are built with the activated Shell Subsystem. This allows the user to introspect a particular component in isolation via Shell commands. This is not ment as an automatic test (could theoretically be done via pytest) but as a way to understand a component and provide a convinient way to probe it during development.Component Tests (in
app/src/components/*/tests/): Tests based on ZTest that test components in isolation on native_sim. These tests publish/subscribe to ZBus channels directly and read emulated devices (e.g. sensor, button, led). Here it is possible to cover many scenarios and edge cases and test them in a reproducible and automatic way in CI (e.g. multiple button presses in rapid succession).Build Tests (via
app/test_cfg/andapp/sample.yaml): The same configurations that are used to interactively operate a component via its shell commands can be used for build tests. These are mainly build tests and can be build for multiple targets (e.g. native_sim, reel_board). This tests interoperability for several boards.
Interactive Testing via Shell
For interactive testing and debugging, components can be built with shell commands enabled. This allows manual verification of component behavior during development.
Test Configurations
The test_cfg/ directory contains configuration files for testing each
component in isolation:
app/test_cfg/
├── button_component.conf    # Button component only + shell commands
├── led_component.conf       # LED component only + shell commands
└── sys_ctrl_component.conf  # System control component only + shell commands
Build with a specific test configuration:
host:~$ west build -b native_sim app -p -- -DEXTRA_CONF_FILE=test_cfg/button_component.conf
host:~$ west build -b native_sim app -p -- -DEXTRA_CONF_FILE=test_cfg/led_component.conf
And run with:
host:~$ ./build/zephyr/zephyr.exe -uart_1_attach_uart_cmd='ln -sf %s /tmp/zephyr_shell'
*** Booting Zephyr OS build v4.3.0-6940-g8c06719191f5 ***
<inf> led_component: LED component initialized
<inf> app: System booted. Main thread going to sleep.
Component Tests
These are integration tests for individual components. Each component is tested with its real dependencies (ZBus, GPIO emulator) to verify:
Correct ZBus message publication/subscription
Proper interaction with emulated hardware
State machine behavior
Each component includes its own tests that are co-located with the source code:
app/src/components/
└── button/tests/
    ├── src/test_button.c
    ├── prj.conf
    └── testcase.yaml
These tests use the GPIO emulator to simulate hardware button presses and verify
that the component correctly publishes SYS_BUTTON_PRESSED events to the
event_ch channel.
As an example we have a closer look at the button test:
Button Component Tests (component.button):
test_button_component_initialized: Verifies GPIO is readytest_button_press_creates_event: Simulates GPIO press and verifies ZBus eventtest_event_type_is_correct: Confirms event isSYS_BUTTON_PRESSEDtest_multiple_presses_generate_multiple_events: Tests debounce and event generation
Run component tests:
# Run all component tests
host:~$ west twister -T app/src/components --integration

# Run specific component tests
host:~$ west twister -T app/src/components/button/tests -v --integration

# Run during development (faster)
host:~$ west build -b native_sim app/src/components/button/tests -p && west build -t run
Build Tests
Build Tests use the same configurations like the Interactive Tests. Twister automatically discovers all tests in the application, including component tests.
Run all tests (component tests + integration tests):
host:~$ west twister -T app/ --integration
INFO    - Zephyr version: v4.3.0
[ .. ]
INFO    - 6 of 7 executed test configurations passed (85.71%)
INFO    - 13 of 13 executed test cases passed (100.00%)
INFO    - Run completed
This runs:
Component tests:
component.button,component.sys_ctrlbuild tests:
basic.app,app.test.button,app.test.led,app.test.sys_ctrl
Run specific test suites:
# Component tests (fast, use ZTest)
host:~$ west twister -T app/src/components/button/tests --integration

# Build tests (shell-based, use console harness)
host:~$ west twister -T app/ -s app.test.button --integration

 # Build test for the whole app
 host:~$ west twister -T app/ -s basic.app --integration
Test Reports and Debugging
After running tests, Twister creates a twister-out/ directory with test
results and artifacts.
Key artifact locations:
twister-out/
├── twister_report.xml          # JUnit XML report for CI systems
└── native_sim_native/
    └── host/zephyr-workshop/
        └── app/src/components/
            └── button/tests/
                └── component.button/
                    ├── handler.log       # Test execution output
                    └── build.log         # Build output
View test results:
# Check which tests failed
host:~$ cat twister-out/twister_report.xml | grep "failures"

# Read detailed test output
host:~$ cat twister-out/native_sim_native/host/zephyr-workshop/\
  app/src/components/button/tests/component.button/handler.log

# Check build errors
host:~$ cat twister-out/native_sim_native/host/zephyr-workshop/\
  app/src/components/button/tests/component.button/build.log
Generate HTML report:
host:~$ pip install junit2html
host:~$ junit2html twister-out/twister_report.xml report.html
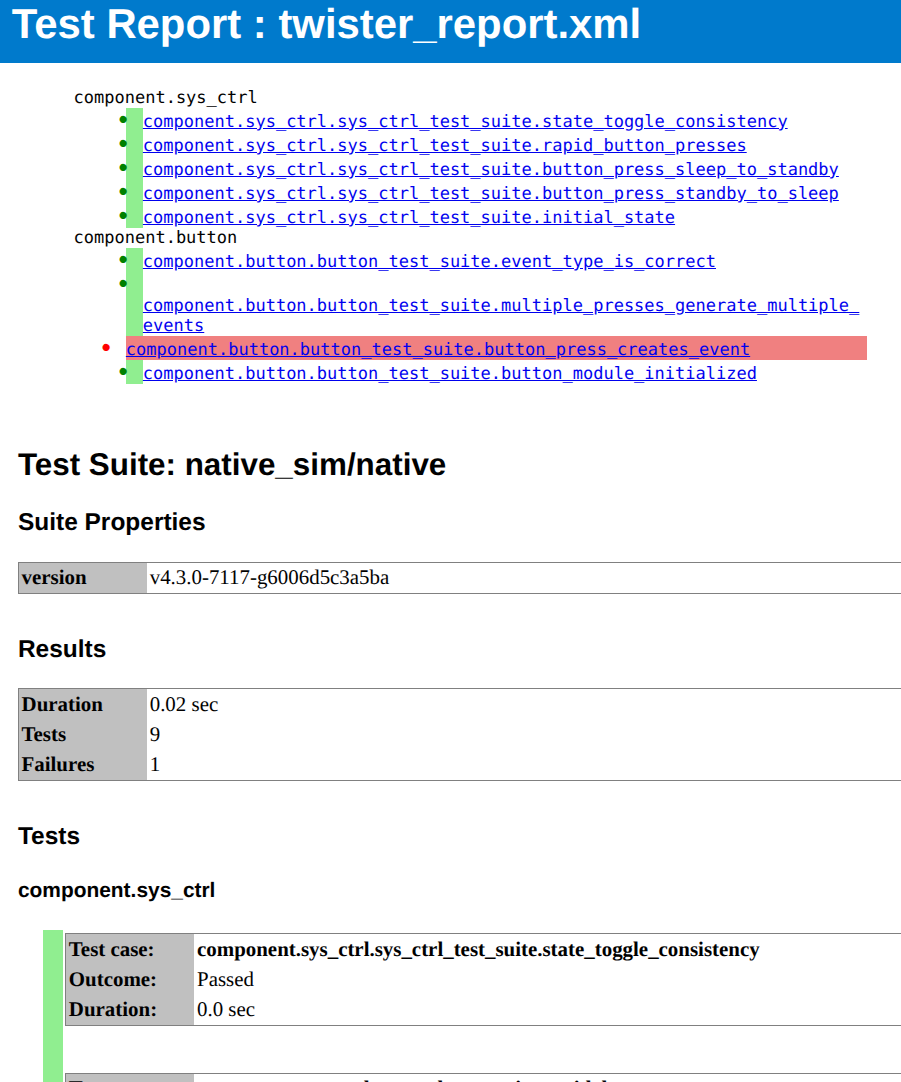
HTML test report, showing test results for component tests. The failing test has a full log in the report so the cause can be identified.